- Shopping, made easy.
- /
- Get the app!
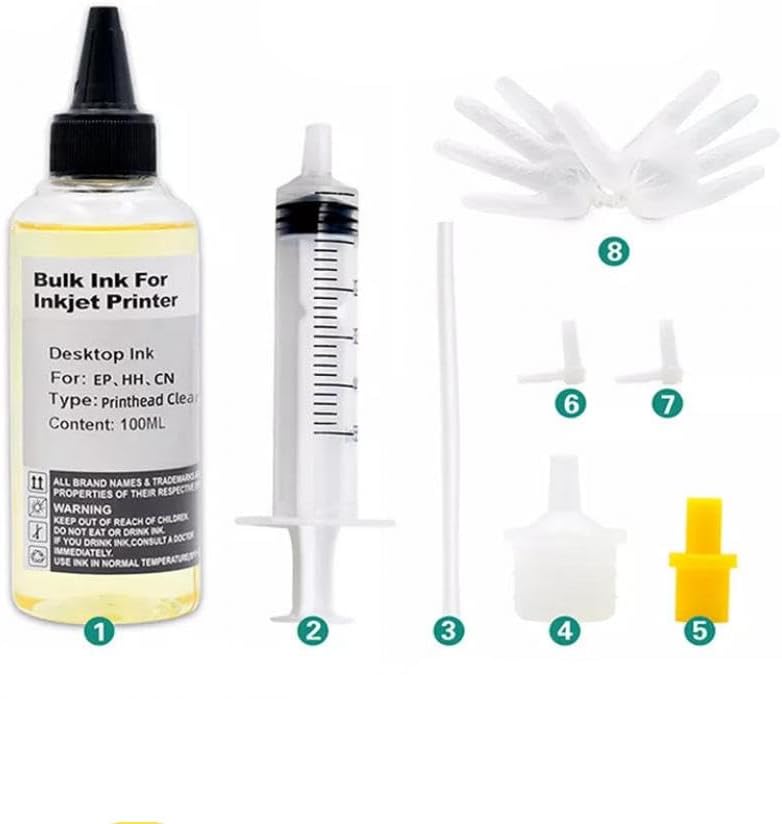
Compatible Inkjet Printer Cleaning Fluid Printhead Cleaner Kit Printers Liquid for Nozzle Inkjet Printers Cleaning KIT Each Kit Contains: - 1× 100ml Liquid Printers Head Cleaning Kit Solution - 1× 5ml syringes - 1× Connector tubing - 1× White nozzle - 1× Yellow nozzle - 1× L-shaped tubes - 1× Disposable gloves - Instruction Suit For Printers: For Inkjet Printer Ink Volume Options: - 100ML - 250ML - 500ML - 1000ML - 20L Printer models may not be listed completely or updated in time, please check with the seller. Product Use: Clean the nozzle (print head) of the inkjet printer to make the printing ink smoother and protect the printer nozzle to extend its service life. This product can clear most of the nozzle clogging and print disconnection caused by various reasons. It is simple to operate, easy to use, and does not damage the nozzle. Cleaning Fluid Advantages: 1. Does not corrode the nozzles and protects the life of print nozzles. 2. Effectively dissolves and removes stubborn crystal clogs. 3. Low cost and affordable price. 4. Made with imported raw materials and professional technology. Cleaning Steps: 1. Press the ink drop button to change the ink cartridge on the printer, the carriage will move to the position where the ink cartridge is replaced, unplug the power cord. 2. Open the car cover and take out the ink cartridge. 3. Use a to draw out some special cleaning fluid from the cleaning fluid bottle. 4. Put the small rubber tube on the and connect it to the ink outlet in the carriage. 5. Inject 12ml of special cleaning liquid into the ink outlet. 6. Repeat the above steps for each ink outlet one by one. 7. When the power is off, put the ink cartridge back into the carriage and cover the carriage cover. 8. Place the printer for 2-3 hours (depending on the clogging of the print head), keeping the power off. 9. After 2-3 hours, turn on the power again and perform the nozzle cleaning. Maintenance Tip: Clean the ink outlet at least once every 1 to 2 months to prolong the service life of the printer. How to Use Cleaning Liquid: 1. Features: - Excellent nozzle cleaning and capillary washing ability. - Helps prevent clogged nozzles. - Toxin-free and anticorrosive. - Easy to use. 2. Uses: - Washing inside of the cartridge. - Washing the cartridge nozzle. - Refining the cartridge. Step-by-Step Cleaning: 1. Wash the old cartridge with the Cleaning Liquid: - Place the nozzle part in the container with the Cleaning Liquid to dissolve solid ink (do not exceed four hours). - Remove remaining ink and Cleaning Liquid around the nozzle part. 2. After refilling ink, extract a little ink using a suction tool. 3. Refinement: - Print a document to check the nozzle condition. - Place the cartridge with the nozzle facing upwards. - Put a few drops of Cleaning Liquid around the nozzle part and let it sit for 3 minutes. - Wipe off excess liquid and seal the liquid exit. For Black & Color Cartridge with Foam: 1. Put 5-7 drops of Cleaning Liquid around the nozzle and let it sit for 5-7 minutes. 2. Remove remaining ink and Cleaning Liquid with suction through the nozzle. 3. Wipe off excess liquid and let the cartridge sit on wet tissue for 5 minutes. Refinement: 1. Print a document to check the nozzle condition. 2. Wipe off the cartridge and seal the liquid exit. Signs of Abnormality and Resolution: - If printing issues persist after cleaning, the cartridge may be damaged and need replacement. - Broken lines may occur if Cleaning Liquid remains around the nozzle; print multiple pages to disperse it. - For clogged nozzles after long non-use, apply 10-15 drops of Cleaning Liquid and let it sit for 5 minutes before printing. Storage: Store in a cool, dry place.
 Headlight Washer Cover Caps Pair Compatible With A5 S5 2012-2016 Models Fits Part Numbers 8T0955276B 8T0955636A 8T0955275B 8T0955635A
SAR 271
Headlight Washer Cover Caps Pair Compatible With A5 S5 2012-2016 Models Fits Part Numbers 8T0955276B 8T0955636A 8T0955275B 8T0955635A
SAR 271
 1968 1982 Corvette C3 Headlight Actuator Repair Kit Seal Boot Rebuild Parts Compatible With GM Vehicles
SAR 351
1968 1982 Corvette C3 Headlight Actuator Repair Kit Seal Boot Rebuild Parts Compatible With GM Vehicles
SAR 351
 AP01 Pistons And Rings Compatible With 2.7L 3RZFE Engine Fits 4Runner T100 Tacoma 94-04 Models Replaces 13103-75041 1310375041 1310175041
SAR 836
AP01 Pistons And Rings Compatible With 2.7L 3RZFE Engine Fits 4Runner T100 Tacoma 94-04 Models Replaces 13103-75041 1310375041 1310175041
SAR 836
 Head Cylinder Stator Cover Gasket Compatible with KLX300 KLX 300 1997 1998 1999 2000 2001 2002 2003 2004 2005 2006 2007
SAR 503
Head Cylinder Stator Cover Gasket Compatible with KLX300 KLX 300 1997 1998 1999 2000 2001 2002 2003 2004 2005 2006 2007
SAR 503