- التسوق ، اصبح سهلا.
- /
- احصل على التطبيق!


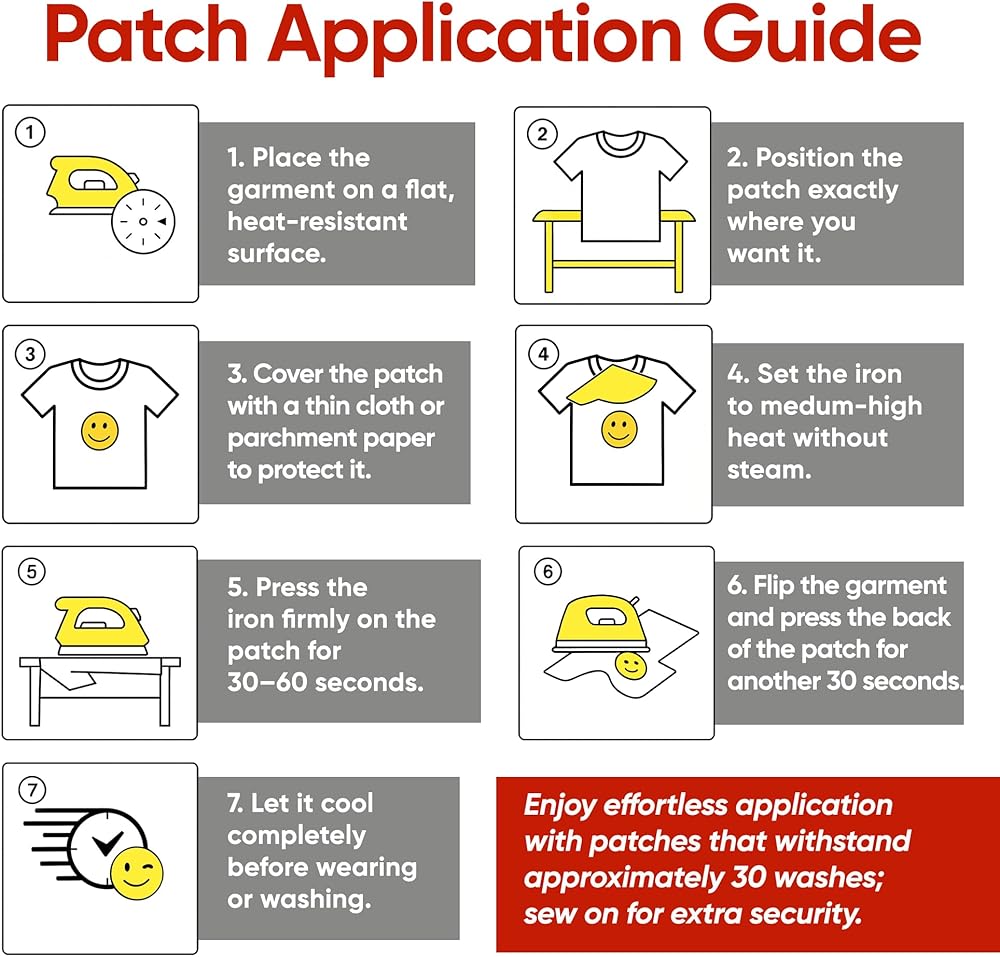
Iron-On Patch Instructions:
1. Set your iron to the appropriate heat setting for the type of fabric and patch you are using.
2. Lay the garment on a hard, heat-resistant surface when applying your iron-on patch. Avoid using a padded ironing board as it may not provide strong adhesion.
3. Place the patch on the fabric, making sure it is positioned correctly.
4. Place a piece of parchment paper or a press cloth will work just as well.
5. Apply firm, constant pressure straight down with the iron for about 30 to 35 seconds without moving the iron.
6. Allow the patch to cool for a little before removing the protective sheet.
7. Turn the garment inside-out and repeat the process on the back side of the patch for about 30 seconds. Be sure and apply constant pressure once again.
8. After applying heat to the patch, check gently if the backing has adequately adhered to the garment. Allow the patch to cool down completely before handling it further. This will help to ensure that the heat-seal backing is securely attached to your garment. If necessary, repeat steps 4-7 to ensure proper adhesion.
 -15%
Yhseen 11 ياردة 4 مم حجر الراين كريستال سلسلة حجر الراين سباركلي زين لتزيين حفلات الزفاف وتزيين أزياء الزفاف (4 مم، حجر شفاف في قاعدة ذهبية)
SAR 89
-15%
Yhseen 11 ياردة 4 مم حجر الراين كريستال سلسلة حجر الراين سباركلي زين لتزيين حفلات الزفاف وتزيين أزياء الزفاف (4 مم، حجر شفاف في قاعدة ذهبية)
SAR 89
 استنسل خط كامل - خلفية هولي كبيرة - استنسل من الحافة إلى الحافة، قالب خط مستمر لخياطة اللحف ذات الحركة الحرة، خياطة اللحف المنزلية، خياطة اللحف اليدوية، خياطة اللحف ذات الذراع الطويلة (30594)
SAR 87
استنسل خط كامل - خلفية هولي كبيرة - استنسل من الحافة إلى الحافة، قالب خط مستمر لخياطة اللحف ذات الحركة الحرة، خياطة اللحف المنزلية، خياطة اللحف اليدوية، خياطة اللحف ذات الذراع الطويلة (30594)
SAR 87
 رباط بوليستر للخياطة بطول 25 ياردة - خياطة منخفضة الكثافة للكورسيهات وقبعات الرضاعة وفساتين الزفاف (ابيض، 6 ملم)
SAR 37
رباط بوليستر للخياطة بطول 25 ياردة - خياطة منخفضة الكثافة للكورسيهات وقبعات الرضاعة وفساتين الزفاف (ابيض، 6 ملم)
SAR 37
 ماردارت مجموعة ادوات خياطة جلدية احترافية 8 قطع مع عجلات تتبع، فتحة نمط من الستانلس ستيل، خرامة خدش، طباشير الخياطين، شريط قياس ناعم لخياطة القماش والورق والجلود
SAR 72
ماردارت مجموعة ادوات خياطة جلدية احترافية 8 قطع مع عجلات تتبع، فتحة نمط من الستانلس ستيل، خرامة خدش، طباشير الخياطين، شريط قياس ناعم لخياطة القماش والورق والجلود
SAR 72