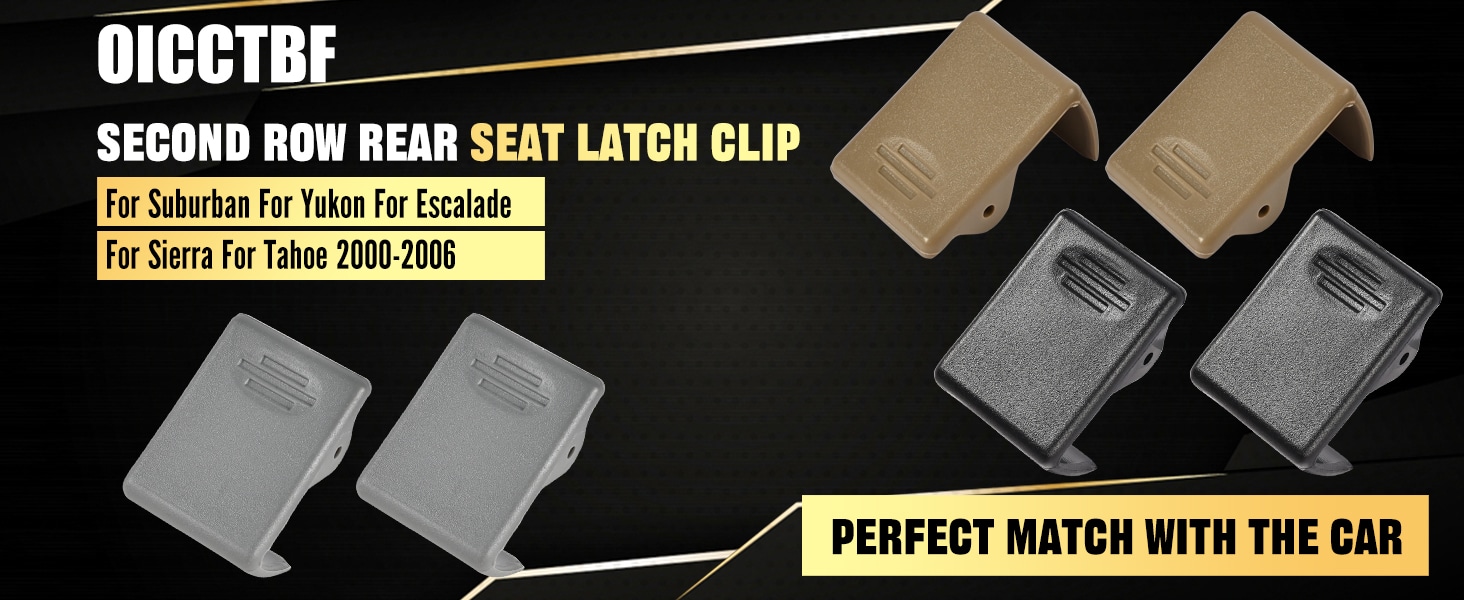
The replacement clips is compatible with for Cadillac Models: for Escalade & Escalade ESV 2002-2006 ; for Chevy Models:for Suburban (1500 or 2500) 2000-2006,for Tahoe 2000-2006; for GMC Models:for Yukon 2000-2006,for Yukon XL (1500 or 2500) 2000-2006,for Yukon Denali & Yukon XL Denali 2001-2006 ,this latch prevents the second row seat panel attached to the rear of the seat from falling into the floor, preventing anyone from sitting comfortably in the third row seats.
When you fold down the seat and fold it up. The panel will flip over. Give you a large flat floor. This will create a large interior space. There is a small latch that can secure the panel to the seat back when the seat is raised. In this way, when sitting in the third row, the seat panel will not hit your leg. Many times, when the seat is lowered, the latch is easily damaged and broken. The broken part is the middle clip.
The replacement clips is made of PC+ABS plastic material,it is exceptional strength and heat resistance, surpassing the OEM latch. This is just the center latch that commonly breaks, you will reuse your original housing with pin and spring.Replaces Part Number 88937926.
With my seat backs, the lip was just a little too short to hold up when hitting bumps. And once I started modifying it, I went a little further and upgraded the design a bit! These are pretty easy to replace, just slide the pin out and get these in place! Needlenose pliers are a must.
To install simply remove the latch assembly from the rear seat by depressing both clips inward with thin flat head screw drivers or a pick. Then push the pin out of the original latch housing making note of which way the spring was seated. Install the new clip in reverse by partially inserting the pin through the thicker side until it protrudes slight out of where the spring will sit. Using a pair of needle nose pliers, position the spring in line with the pin and push the pin fully through the other side.


 -4%
2Pcs Air Fryer Silicone Liners Rectangular for Ninja Foodi Dual DZ201 8QT/DZ090 6QT/Ninja DoubleStack SL201 8QT, MMH Reusable Airfryer Pot Baking Basket | Non-stick | Easy Cleaning | Food Safe | Black
SAR 70
-4%
2Pcs Air Fryer Silicone Liners Rectangular for Ninja Foodi Dual DZ201 8QT/DZ090 6QT/Ninja DoubleStack SL201 8QT, MMH Reusable Airfryer Pot Baking Basket | Non-stick | Easy Cleaning | Food Safe | Black
SAR 70
 Black 1.18in/30mm Lowering Link for Honda XR650L 1993-2023 for XR600R 1985-2023,Motorcycle Billet Aluminum CNC Lowers Rear Suspension for Dual Sport Off-road Bike Accessories.
SAR 209
Black 1.18in/30mm Lowering Link for Honda XR650L 1993-2023 for XR600R 1985-2023,Motorcycle Billet Aluminum CNC Lowers Rear Suspension for Dual Sport Off-road Bike Accessories.
SAR 209
 Front Headlight with Cover for Sur Ron Ultra Bee 2022 2023,Motorcycle Headlamp Bright Lamp with Switch Shroud Head Light Assemblies,Plug N Play
SAR 365
Front Headlight with Cover for Sur Ron Ultra Bee 2022 2023,Motorcycle Headlamp Bright Lamp with Switch Shroud Head Light Assemblies,Plug N Play
SAR 365
 Center Console Cup Holder for Porsche Boxster 996 986 911 1997-04 for Porsche Carrera 1999-2004,Center Console Beverage Drink Insert for Most Standard Sized Cups
SAR 209
Center Console Cup Holder for Porsche Boxster 996 986 911 1997-04 for Porsche Carrera 1999-2004,Center Console Beverage Drink Insert for Most Standard Sized Cups
SAR 209


