- Shopping, made easy.
- /
- Get the app!

Product model: Suitable for Lanair waste oil heater replacement part 9533 oil temperature switch set Excellent Quality:12V Starter solenoid relay is made of high-quality material, wear-resistant, corrosion-resistant, rigorously tested and has a long service life Fits all Lanair brands:HI-140, HI-180, HI-260, HI-320, MX-150, MX-200, MX-250, MX-300, MXD-200, MXD-300, And ALL XT (NOT XT 75) Easy To Install:1. Fix the two chucks on the oil block with the provided screws. 2. The quick-move disk with a reset button should be placed in the upper right corner. 3. Connect a 3.5-inch-long wire with two blue contacts to the left side of the two snap discs 4. Place a 15-inch black wire with red contacts at both ends on the right side of the upper buckle disk. Place another black wire on the right side of the lower buckle disk Slide the black sleeve over the wire. You may need to make a small opening in the small sleeve to cover the wires. After assembling the preheater assembly, wire it in accordance with the instructions in the user manual
 W11457841 Surface Unit Switch for Whirlpool W11457841
SAR 111
W11457841 Surface Unit Switch for Whirlpool W11457841
SAR 111
 807047901 fits for Electrolux Frigidaire ERP Dishwasher Water Inlet Solenoid Valve
SAR 306
807047901 fits for Electrolux Frigidaire ERP Dishwasher Water Inlet Solenoid Valve
SAR 306
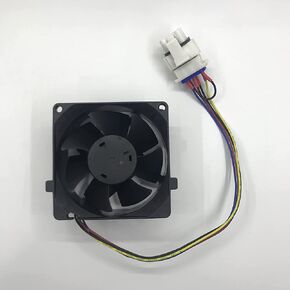 Evaporator Fan Motor WR60X26866 WR60X10357 For GE Refrigerator
SAR 118
Evaporator Fan Motor WR60X26866 WR60X10357 For GE Refrigerator
SAR 118
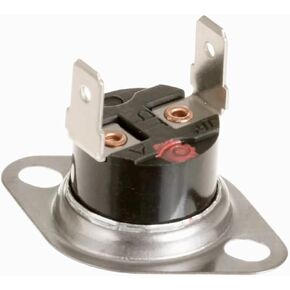 WB27X11213 WB24X28950 Microwave Thermostat Fit for Hamilton Beach Microwave Ge Whirlpool Replacement
SAR 52
WB27X11213 WB24X28950 Microwave Thermostat Fit for Hamilton Beach Microwave Ge Whirlpool Replacement
SAR 52